Swingline World
 Prerequesite: None currently
Levels: Practice, Slide, Hide, Stride, Glide, Bona Fide
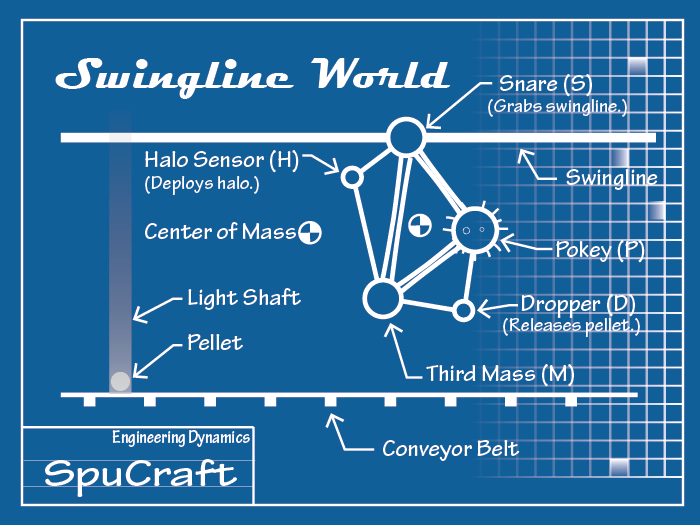
Here, you need to pilot a spuCraft that doesn’t have thrusters. All your energy comes from an initial drop, before latching onto the swingline. Then, you have to have to maneuver to the left and right, sometimes avoiding dangerous flowers, by well coordinated grab and release actions. To safely safely complete the higher levels, you will need to grab with the grace of a brachiating ape. All the elements have to work just right.
List of Links
- Reference Sheets
- Swing Practice
- Thinking about the Mechanics of Locomotion
- “Hide” Level – Flying Blind
- “Stride” Level – Avoid the Flowers
- Help! I can’t figure out… (outdated)
Reference Sheets
Here are the reference sheets from the spuPilot (updated Fall 2014). Click to enlarge.

![]()
Swing Practice
Before we jump into the Swingline Challenge, it’s a good idea to play around with the spuCraft used in Swingline…. to figure out how it works; to figure out how to make it move left and right; to figure out how to make it launch pellets. The video below provides you enough to get started. You will have to figure out the details.
Thinking about the Mechanics of Locomotion
After having played with the spuCraft in the practice level a little, you should be able to run and complete the first challenge called “Slide.” To get much farther, though, you are going to have to start thinking about the dynamics of the spuCraft in terms of physical principles, i.e. Euler’s equations for rigid bodies:
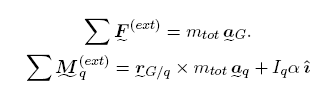
On the left side of the top equation, we have the sum of the external forces acting on the spuCraft. On the left side of the second equation, we have the sum of the moments about some point q due to external forces.
The figure below shows two sketches of the spuCraft. In the diagram on the left, the snare is in its “release” state and is free to slide along the swingline without any friction. On the right, the snare is in its “grab” state.

You will find that a deeper understanding of how the spuCraft moves will help you succeed in the “Hide” level and all subsequent levels. [Note: If you are in MEE 211, you will want to use the questions provided to you in the official assignment posted on Piazza.]
- Draw free body diagrams for the spuCraft when the snare is in the “release” state and when it is in the “grab” state.
- Along the right side of the screen in the Swing Level, various quantities are displayed numerically. Also, along the top of the screen, several of these quantities are displayed graphically. Through experimentation and observation of the craft in its “grab” and “release” states, I want you to figure out what each of the curves represents. Each curve corresponds to one of the numbers displayed on the right. Note that, except for the dark blue curve, all curves depict a value of 0.0 when they are centered within the window (on the white dashed line). — What dynamic quantity does the cyan (light blue) curve represent? –What dynamic quantity does the red curve represent? — What dynamic quantity does the yellow curve represent? — What dynamic quantity does the dark blue curve represent?
- Perform multiple “grab” and release” maneuvers. Each time, observe what happens to the velocity of the center of mass when the snare is in the “release” state. Briefly describe the special characteristic of the velocity of the center of mass when the snare is in the “release” state.
- Explain why the interesting behavior you found in the previous question occurs. Use the free body diagram(s) you drew earlier and equation(s) of motion.
- Suppose the spuCraft is in its “grab” state and it is making complete rotations, counter-clockwise. Answer the following questions about getting the spuCraft to move (or not move). Justify your answer using physical principles.
- If you want the spuCraft to drift to the right as fast as possible, at what instant should you “release” the snare?
- If you want the spuCraft to drift to the left as fast as possible, at what instant should you “release” the snare?
- In which direction (left or right) can you get the spuCraft to move fastest? You might want to use the behavior of the yellow curve in the plot to justify your answer.
- If you do not want the spuCraft to drift left or right when you release the snare, when should you release the snare?
“Hide” Level – Flying Blind
In order to succeed in the “Hide” Level challenge, there is a portion where you are going to have to fly “blind”. That is, you will not be able to see your spuCraft. Instead, you will have to pilot it, using the plots to guide you. Therefore, before beginning the Hide level, I urge you go to the practice world and figure out what each of the colored curves represents. I would suggest you go through the locomotion exercise.
If you’re still having difficulty with Hide, you may want to check out the help page. (Coming soon.)
“Stride” Level – Avoid the Flowers
To successfully complete the Stride level, you are going to have to maneuver your spuCraft in a way that avoids the deadly falling flowers. The following video provides an overview of things you are going to have to think about.
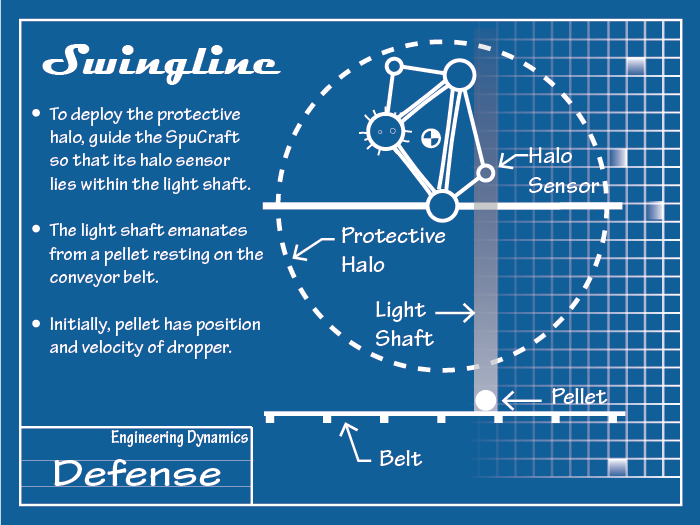
SpuCraft kinematics. In order to get the halo sensor to synchronize with the belt, you are going to have to be able to calculate the velocity of the sensor. The video below reviews some of the important concepts of rigid body kinematics that are relevant to the challenge. It also covers some practical computational aspects necessary in order to get your scripts to work.
Positioning the halo sensor. In the previous video, we figured out how to write a mathematical expression for the velocity of the halo sensor. In this next video, we use the expression to realize that the dynamics of the halo sensor are a little too erratic to be useful. However, it turns out that we can change the configuration of the spuCraft. In particular, it is possible to place the halo sensor in a more productive location. Your task is to figure out where to place the halo sensor that it can move in sync with the belt. (What do I mean when I say “mov[ing] in sync with the belt”?)
Mechanics of the Pellet. Finally we need to think about the mechanics of the pellet. Somehow, we need to deposit a pellet onto the conveyor belt precisely below the halo sensor. As I outline in the video below, this seems incredibly difficult. However, if you choose locations of your halo sensor and pellet dropper intelligently, the task can be quite easy.
To help you think about where to place the pellet dropper, I encourage you to go through the following exercise.
- Draw a free body diagram of the pellet when it is in flight, shortly after being released.
- Based upon the free body diagram you created in the previous question, what can you say about the horizontal component of the pellet’s velocity after being released? Explain why.
- At this stage, I’m going to assume that you have placed the halo sensor so that when the spuCraft’s snare is in its release state, horizontal component of the sensor’s velocity is constant. Assuming the snare is released, where should you place the pellet dropper so that when the pellet is released “in sync” with the halo sensor, and it remains directly aligned (above or below) with the halo sensor while it is in flight. Explain it.
Now, all you have to do to beat the Slide level, is to put all these pieces together.
“Glide” Level – Minding the Energy
The Glide level starts very similar to Stride. However, this time you need to do a lot more stops and starts. To succeed in Glide, you are going to need enough energy to keep pace with a fast-moving fifth belt and make it to the finish line. You will have to figure out how to get around without losing energy. To figure out how to do it, I urge you to go back to the Swing Practice Event where you can practice locomotion and, at the same time, see how the maneuvers impact energy.
How can you avoid the types of actions that lose energy. You should program an automatic switch so that you can execute the maneuver precisely.
Help! I can’t figure out …
Can’t figure something out? Here are some posts aimed at getting you back on track.